Uiautomator2 是一个强大的 Android 自动化库,通过基于 HTTP JSON-RPC 的通信实现 Python 应用程序与 Android 设备的桥接。该框架通过直观的 Python 接口暴露 Android 原生 UI 自动化功能,简化了自动化流程。官方仓库:https://github.com/openatx/uiautomator2安装配置
系统要求
| 要求 | 最低版本 | 描述 |
|---|
| Android | 4.4+ | 目标 Android 设备的操作系统版本 |
| Python | 3.8+ | Python 运行时环境 |
| ADB | 最新版本 | 用于设备通信的 Android 调试桥 |
安装
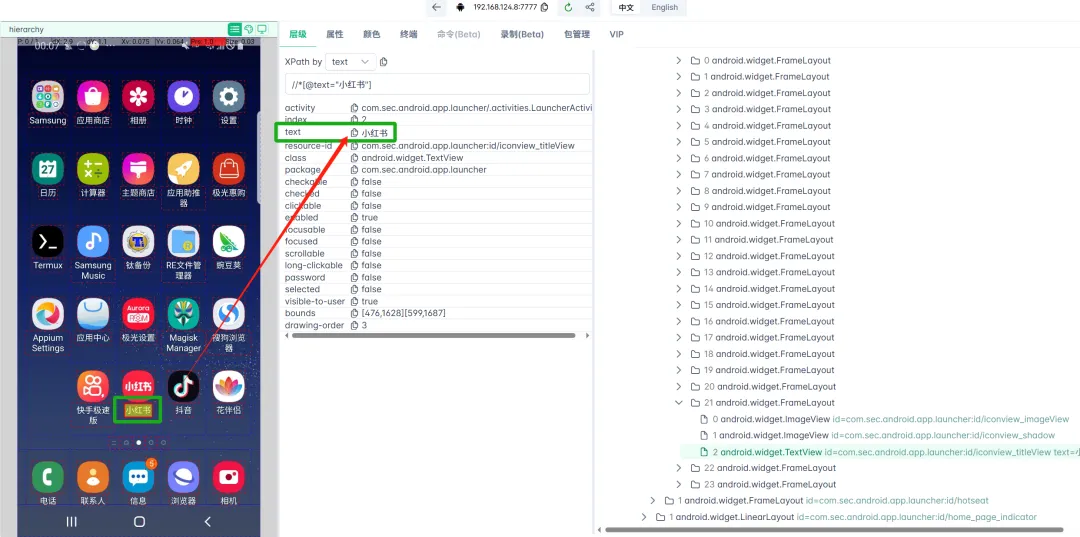
uiautodev调试工具。提供了用于检查 UI 元素和生成 XPath 选择器的可视化界面,能显著加快开发速度。pip install uiautodev# 启动检查器(自动打开浏览器)uiautodev
连接设备
使用序列号连接:
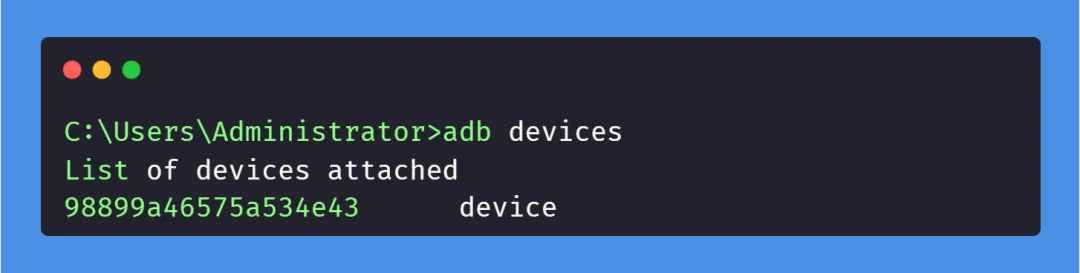
手机USB链接电脑后,通过ADB获取序列号:
import uiautomator2 as u2d = u2.connect("98899a46575a534e43")
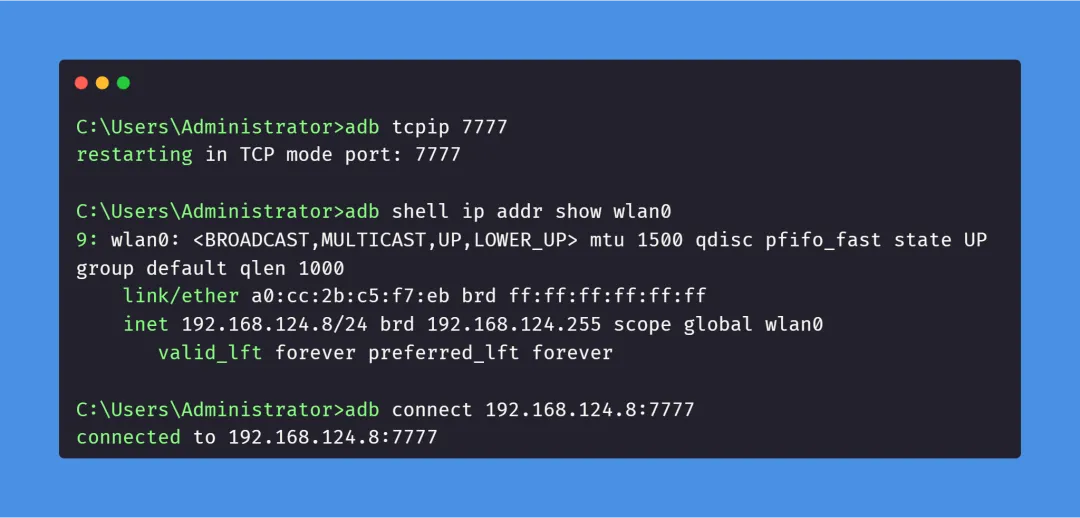
使用WIFI连接:
先开启ADB TCP模式,并连接手机:
import uiautomator2 as u2d = u2.connect("192.168.124.8:7777")
打印设备信息:
import jsonimport uiautomator2 as u2d = u2.connect("98899a46575a534e43")print(json.dumps(d.info, indent=2))
{ // 当前前台运行的应用程序包名 "currentPackageName": "com.sec.android.app.sbrowser", // 屏幕的物理高度(单位:像素/px) "displayHeight": 2220, // 屏幕当前的旋转角度 "displayRotation": 0, // 屏幕的逻辑宽度(单位:dp / 密度无关像素) "displaySizeDpX": 360, // 屏幕的逻辑高度(单位:dp / 密度无关像素) "displaySizeDpY": 740, // 屏幕的物理宽度(单位:像素/px) "displayWidth": 1080, // 设备的内部产品代号 (Codename) "productName": "dreamqltezc", // 屏幕是否处于点亮状态 "screenOn": true, // Android SDK 版本号 (API Level) "sdkInt": 28, // 设备是否处于自然方向 "naturalOrientation": true}
核心语法
🟢元素定位
XPath定位
# 通过文本定位d.xpath('//*[@text="登录"]').click()# 通过id定位(语法糖)d.xpath('@login_button').click()# 组合定位d.xpath('//android.widget.Button[@text="登录"]').click()# 父子关系定位d.xpath('@list').child('//*[@text="item"]').click()# 高级查询(AND/OR)(d.xpath("登录") & d.xpath("@button")).get()
基本选择器用法
| 字段名 (Field) | 掩码值 (Hex) | 描述 (Description) |
|---|
| text | 0x01 | 精确文本匹配 |
| textContains | 0x02 | 包含部分文本 |
| textMatches | 0x04 | 文本正则匹配 |
| textStartsWith | 0x08 | 文本以此开头 |
| className | 0x10 | UI 组件类名 (精确) |
| classNameMatches | 0x20 | UI 组件类名 (正则) |
| description | 0x40 | 内容描述 (Content-Desc) |
| descriptionContains | 0x80 | 内容描述包含文本 |
| descriptionMatches | 0x0100 | 内容描述正则匹配 |
| descriptionStartsWith | 0x0200 | 内容描述以此开头 |
| checkable | 0x0400 | 是否可勾选 |
| checked | 0x0800 | 是否已勾选 |
| clickable | 0x1000 | 是否可点击 |
| packageName | 0x80000 | 应用程序包名 |
| resourceId | 0x200000 | 资源标识符 (ID) |
# 通过文本选择元素element = d(text="设置")# 通过资源 ID 选择元素element = d(resourceId="com.example.app:id/button")# 通过描述选择元素element = d(description="点击我")# 组合多个属性element = d(text="登录", className="android.widget.Button")
# 检查元素是否存在if d(text="设置").exists: print("找到元素")# 获取元素信息info = d(text="设置").infoprint(f"元素边界:{info['bounds']}")# 获取元素边界lx, ly, rx, ry = d(text="设置").bounds()# 获取元素中心坐标center_x, center_y = d(text="设置").center()
🟢点击操作
基本点击
# 简单点击d(text="按钮").click()# 带超时的点击d(text="按钮").click(timeout=10)# 从中心偏移点击d(text="按钮").click(offset=(0.3, 0.7)) # 距左边缘 30%,距顶部 70%
# 仅在元素存在时点击(返回布尔值)success = d(text="按钮").click_exists()# 点击并等待元素消失d(text="按钮").click_gone(maxretry=5, interval=1.0)# 带持续时间的长点击d(text="按钮").long_click(duration=2.0)
🟢输入操作
文本输入与检索
# 设置文本d(resourceId="com.example.app:id/input").set_text("你好世界")# 发送按键(set_text 的别名)d(resourceId="com.example.app:id/input").send_keys("你好世界")# 从字段获取文本text = d(resourceId="com.example.app:id/input").get_text()# 清除文本d(resourceId="com.example.app:id/input").clear_text()
🟢手势操作
滑动操作
# 向不同方向滑动元素d(text="列表项").swipe("up")d(text="列表项").swipe("down") d(text="列表项").swipe("left")d(text="列表项").swipe("right")# 自定义步数滑动d(text="列表项").swipe("up", steps=20)
# 将元素拖动到坐标d(text="可拖动").drag_to(100, 200)# 将元素拖动到另一个元素d(text="源").drag_to(text="目标")# 带持续时间的拖动d(text="源").drag_to(text="目标", duration=1.5)
# 捏合手势d(text="图像").pinch_in(percent=50, steps=30)d(text="图像").pinch_out(percent=100, steps=50)# 自定义两点手势d(text="画布").gesture((0.2, 0.5), (0.8, 0.5), (0.5, 0.2), (0.5, 0.8), steps=100)
🟢等待操作
# 方式一:全局等待d.implicitly_wait(10.0) # 所有操作最多等10秒# 方式二:精准等待# 等待元素出现el = d.xpath('@button').wait(timeout=15)# 等待元素消失d.xpath('@loading').wait_gone(timeout=10)# 存在即点击(不报错)d.xpath('@agree').click_exists()# 必须存在(找不到就报错)d.xpath('@submit').get(timeout=5)
🟢元素导航
子元素与同级元素导航
# 查找子元素parent = d(resourceId="com.example.app:id/container")child = parent.child(text="子按钮")# 查找同级元素element = d(text="标签")sibling = element.sibling(text="输入字段")# 通过特定属性查找子元素child_by_text = parent.child_by_text("提交")child_by_description = parent.child_by_description("图标")
🟢处理多个元素
访问多个元素
# 获取匹配元素的数量count = d(className="android.widget.Button").count# 访问特定实例first_button = d(className="android.widget.Button")[0]second_button = d(className="android.widget.Button")[1]# 遍历所有元素for button in d(className="android.widget.Button"): print(button.info['text'])
🟢屏幕截图与录制
屏幕截图
import uiautomator2 as u2d = u2.connect()# 保存截图到文件d.screenshot("screen.png")# 获取 PIL Image 对象pil_image = d.screenshot()# 获取 OpenCV 格式cv_image = d.screenshot(format="opencv")
import uiautomator2 as u2d = u2.connect()# 开始录制d.screenrecord("output.mp4", fps=20)# 在设备上执行操作d.click(100, 200)d.swipe(100, 200, 300, 400)# 停止录制success = d.screenrecord.stop()
# 自动化的模板匹配d.image.click("target_image.png", timeout=10.0)# 像素级操作pixel = d.image.getpixel(100, 200) # 返回 (r, g, b)# 图像比较similarity = d.image.match("reference.png")
🟢监视器系统
Watcher 系统提供了一种强大的事件驱动机制,用于在自动化测试过程中自动处理意外的 UI 元素和对话框。该架构通过监控 UI 中的特定模式,并在检测到这些模式时执行预定义操作,从而实现脚本执行的健壮性。# 监控"允许"弹窗,自动点击d.watcher("AUTO_ALLOW").when('//*[@text="允许"]').click()# 监控"跳过"广告d.watcher("AUTO_SKIP").when('//*[@text="跳过"]').click()# 启动监控d.watcher.start()# 你的脚本正常跑,弹窗自动处理!d.app_start('com.example.app')d.xpath('@home').click()d.xpath('@profile').click()# 停止监控d.watcher.stop()
🟢应用管理
# 启动应用d.app_start('com.tencent.mm')# 停止应用d.app_stop('com.tencent.mm')# 强制停止并清除数据d.app_clear('com.tencent.mm')# 获取应用信息info = d.app_info('com.tencent.mm')print(info)# 查看运行中的应用running = d.app_list_running()# 停止所有第三方应用d.app_stop_all()
🟢设备管理
# 按键操作d.press('home') # Home键d.press('back') # 返回键d.press('recent') # 最近任务# 屏幕方向d.orientation = 'left' # 横屏d.orientation = 'natural' # 竖屏# 打开通知栏d.open_notification()# 屏幕开关d.screen_off()d.screen_on()
实操:小红书AI自动化私信
import timeimport uiautomator2 as u2from datetime import datetimefrom openai import OpenAIimport logging# ================= 配置区域 =================CONFIG = { "DEVICE_ID": "98899a46575a534e43", "API_KEY": "sk-110***************8d", # Deepseek_API "BASE_URL": "https://api.deepseek.com", "APP_PACKAGE": "com.xingin.xhs", "MAX_HISTORY": 50 # 限制AI最大上下文轮数}# ================= 日志配置 =================logging.basicConfig( level=logging.INFO, format='%(asctime)s - [%(levelname)s] - %(message)s', datefmt='%H:%M:%S')logger = logging.getLogger("Bot")class DeepSeekService: def __init__(self): self.client = OpenAI(api_key=CONFIG["API_KEY"], base_url=CONFIG["BASE_URL"]) self.user_memories = {} self.system_prompt = { "role": "system", "content": ( "你是一名专业、热情且高情商的【技术服务销售顾问】。" "你的目标是解答客户的技术疑问,并引导他们购买我们的技术服务或索要联系方式。" "请遵守以下规则:" "1. 回复要简短有力,口语化,适合小红书风格。" "2. 不要一次性回答所有细节,要像聊天一样抛砖引玉,引导客户继续提问。" "3. 如果客户询问价格或复杂方案,引导他们说:'具体的方案稍复杂,方便后台留个V或者发个需求文档吗?'" "4. 严禁输出代码块或长篇大论,保持亲和力。" ) } def get_reply(self, username, user_text): if username not in self.user_memories: self.user_memories[username] = [self.system_prompt] history = self.user_memories[username] history.append({"role": "user", "content": user_text}) # 限制上下文长度 if len(history) > CONFIG["MAX_HISTORY"]: self.user_memories[username] = [history[0]] + history[-(CONFIG["MAX_HISTORY"] - 1):] try: response = self.client.chat.completions.create( model="deepseek-chat", messages=self.user_memories[username], temperature=1.3 ) ai_reply = response.choices[0].message.content history.append({"role": "assistant", "content": ai_reply}) logger.info(f"[{username}] 问: {user_text}") logger.info(f"[{username}] 答: {ai_reply}") return ai_reply except Exception as e: logger.error(f"DeepSeek API Error: {e}") return "不好意思呀,刚才网络卡了一下,您能再说一遍吗?😂"class XHSBot: def __init__(self): logger.info("正在连接设备...") self.d = u2.connect(CONFIG["DEVICE_ID"]) self.d.implicitly_wait(5.0) self.ai_service = DeepSeekService() self.processed_history = [] # 仅用于运行时去重,可以对接数据库做持久化 def unlock(self): """解锁屏幕""" try: self.d.swipe(0.5, 0.9, 0.5, 0.1) # 保持原有的ID定位不变 keys = ["key1", "key2", "key3", "key4"] for key in keys: self.d(resourceId=f"com.android.systemui:id/{key}").click_exists(timeout=1) self.d(resourceId="com.android.systemui:id/key_enter_text").click_exists(timeout=1) logger.info("设备已尝试解锁") time.sleep(2) except Exception as e: logger.error(f"解锁过程出错: {e}") def app_init(self): """启动并进入消息页""" self.d.app_start(CONFIG["APP_PACKAGE"]) time.sleep(2) if self.d.info["currentPackageName"] != CONFIG["APP_PACKAGE"]: logger.error("小红书打开失败") return False retry = 0 while retry < 5: if self.d(descriptionStartsWith="消息").exists(): self.d(descriptionStartsWith="消息").click() logger.info("APP初始化成功,位于消息页") return True self.d.press("back") retry += 1 time.sleep(1) return False def send_message(self, msg): """发送消息""" try: edit_text = self.d(className="android.widget.EditText") if edit_text.exists(timeout=3): edit_text.click() edit_text.set_text(msg) time.sleep(1) # 保持原有的定位逻辑 send_btn = self.d(className="android.widget.TextView")[-1] if send_btn.exists(): send_btn.click(timeout=5) else: logger.warning("未找到输入框") except Exception as e: logger.error(f"发送消息异常: {e}") def get_chat_detail(self): """获取最后一条消息内容""" try: title_bar = self.d(className="android.widget.RelativeLayout").child(className="android.view.ViewGroup") if len(title_bar) > 3: username = title_bar[3].child(className="android.widget.TextView").get_text() else: username = "Unknown" msg_list = self.d(className="androidx.recyclerview.widget.RecyclerView", clickable=True) # 使用 .info.get 安全获取 if msg_list.exists() and msg_list.info.get('childCount', 0) > 0: last_item = msg_list.child(className="android.widget.LinearLayout", clickable=True)[-1] chat_bubble = last_item.child(className="android.view.ViewGroup") if chat_bubble.exists(): bounds = chat_bubble.info.get("bounds") # 判断消息方向 (left=48 通常是对方消息,根据实际情况调整) if bounds and bounds.get("left") <= 50: msg_content = chat_bubble.child(className="android.widget.TextView").get_text() return { "username": username, "msg": msg_content, "time": datetime.now().strftime("%Y-%m-%d %H:%M:%S") } except Exception as e: logger.error(f"解析消息出错: {e}") return None def process_one_unread(self): """查找并点击未读""" try: all_rows = self.d(className="androidx.recyclerview.widget.RecyclerView").child( className="android.view.ViewGroup") for row in all_rows: # 增加 try 以防遍历过程中元素失效 try: desc = row.info.get("contentDescription", "") if desc and "未读" in desc: logger.info(f"发现未读消息: {desc}") row.click() return True except Exception: continue except Exception as e: logger.error(f"扫描列表出错: {e}") return False def back_to_list(self): """安全返回""" self.d.press("back") time.sleep(0.5) if self.d(className="android.widget.EditText").exists(): self.d.press("back") def run(self): self.d.screen_on() if self.d(resourceId="com.android.systemui:id/notification_preview_icon_slot_view").exists(): self.unlock() self.app_init() while True: try: # 查找未读 has_unread = self.process_one_unread() if has_unread: time.sleep(1) # 等待页面跳转 # 获取消息详情 chat_data = self.get_chat_detail() if chat_data: # 组合消息对象 current_fingerprint = (chat_data['username'], chat_data['msg']) # 获取上一条处理记录 last_fingerprint = None if self.processed_history: last_msg = self.processed_history[-1] last_fingerprint = (last_msg['username'], last_msg['msg']) # 对比并回复 if current_fingerprint != last_fingerprint: reply_text = self.ai_service.get_reply(chat_data['username'], chat_data['msg']) self.send_message(reply_text) self.processed_history.append(chat_data) # 清理历史防止无限增长 if len(self.processed_history) > 1000: self.processed_history.pop(0) else: logger.info("重复消息或非目标消息,跳过") # 4. 返回 self.back_to_list() else: logger.info("监控中 - 暂无新消息...") time.sleep(1) except KeyboardInterrupt: logger.info("手动停止") break except Exception as e: logger.error(f"主循环异常: {e}") time.sleep(1)if __name__ == '__main__': bot = XHSBot() bot.run()
效果演示:
功能扩展(uiautomator2 + mitmproxy)
自动化常见问题:
速度慢:OCR 和 UI 检索都需要几百毫秒甚至秒级。
信息不全:UI 上可能只显示 "你好...",而 API JSON 里有完整的 "你好,我想咨询价格"。
定位难:对方发图片、表情包时,UI 很难判断内容,但 API 会明确返回 type: image 或 url。
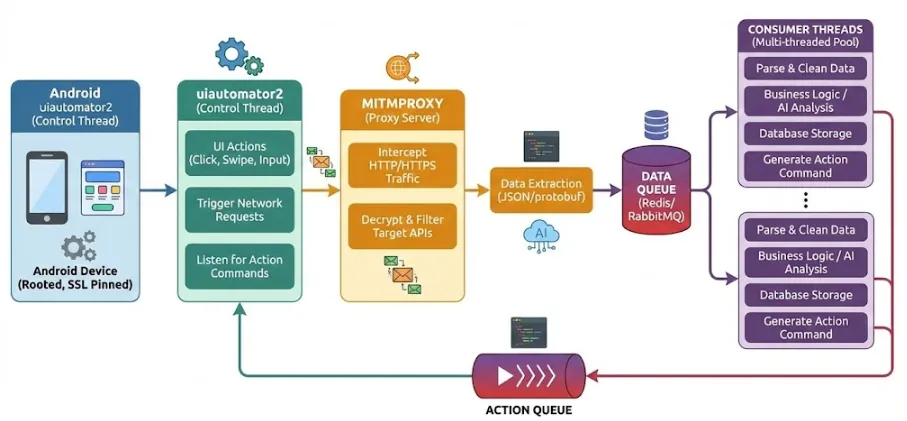
引入 mitmproxy 后: 脚本只需要负责“保持 APP 活着并刷新”,mitmproxy 负责在后台静默截获所有消息数据。
uiautomator2 + mitmproxy 运行两个独立的进程:
Mitmproxy 插件进程:实时监听网络流,过滤出“消息列表”接口的响应数据,推送到队列/数据库。
U2 主控进程:消费队列中的数据,根据数据逻辑控制手机进行回复操作。
架构对比(uiautomator2 vs Appium)
| 维度 | uiautomator2 | Appium |
|---|
| 学习难度 | ⭐⭐⭐⭐⭐ 超简单 | ⭐⭐ 需要学习WebDriver |
| 启动速度 | ⭐⭐⭐⭐⭐ 秒级启动 | ⭐⭐ 需启动Server |
| 配置复杂度 | ⭐⭐⭐⭐⭐ pip安装即可 | ⭐ 需配置多种环境 |
| 稳定性 | ⭐⭐⭐⭐⭐ 基于原生API | ⭐⭐⭐ 需桥接转换 |
| 跨平台 | ⭐ 仅Android | ⭐⭐⭐⭐⭐ iOS+Android |
| 资源占用 | ⭐⭐⭐⭐⭐ 轻量级 | ⭐⭐⭐ 重量级 |
| 调试便利性 | ⭐⭐⭐⭐ Python直接调试 | ⭐⭐⭐ 需查看日志 |
| 并发测试 | ⭐⭐⭐ 需自己实现 | ⭐⭐⭐⭐⭐ 原生支持Grid |
| 社区支持 | ⭐⭐⭐⭐ 国内活跃群 | ⭐⭐⭐⭐⭐ 全球大社区 |
 有需求的朋友可以按文章自行测试,如果有帮助,还请帮忙点赞关注,感谢