跟着cc一起学鸿蒙开发21-网络数据请求
- 2026-10-11 07:07:16
哈罗,这里是cc。前面二十篇我们把"界面怎么搭、状态怎么管、页面怎么跳、弹窗菜单怎么弹、动效怎么加"都讲完了。一个 App 到此"能用"也"好看"了——但你还记得吗?前面所有例子的数据,都是我们在代码里「写死的假数据」。
❝「一个只看死数据的 App,不是真 App。」 你刷到的朋友圈、看到的天气、搜到的商品,全是从服务器实时拉来的。让 App 学会"上网要数据、把数据交回服务器",它才真正活起来。
❞
所以这一篇,我们来把"网络数据请求"这件事讲一讲。先给一个核心认知:
❝「网络请求的本质,是"向服务器要/交数据",拿回来的数据塞进
❞@State,UI 自动刷新。」 驱动 UI 的,还是你第13~15篇学的状态管理;网络只是"数据的来源"换成了远端,而不是本地写死。
❝📌 (DevEco 工程里
❞module.json5的compatibleSdkVersion: 22)。网络部分优先用 RCP(Remote Communication Kit,是官方首推的现代框架),http模块作为经典稳方案一并讲解。
下面先给出一张总图认个脸。
一、先认脸:网络请求分哪几类
┌────────────────────────────────────────────────────────────────┐│ 鸿蒙网络请求 全家福 ││ ││ 【请求方法(按"动作"分)】 ││ GET 拿数据(查) 最常用:拉列表、拉详情 ││ POST 提交 / 新建(增) 发帖、登录、上传表单 ││ PUT 整体更新(改) 改资料 ││ DELETE 删除 删内容 ││ ││ 【两套 API(按"用谁"分,API 22)】 ││ RCP @kit.RemoteCommunicationKit 新推框架,现代、强 ││ http 模块 @kit.NetworkKit 经典方案,稳、例子多 ││ ││ 一条主线贯穿始终: ││ 发起请求 → 拿到数据 → 塞进 @State → UI 自动刷新(接13~15篇) │└────────────────────────────────────────────────────────────────┘选型速记:
session.get/post | |
http.request(GET)session.get | |
http.request(POST)session.post | |
session.download / http.downloadFile | |
session.upload / http.uploadFile |
❝零基础友好提示:第一次学,建议先用
❞http模块(概念少、代码直白);等跑通了,再用 RCP 升级。两套路子"拿到数据塞@State"的套路完全一致。
二、第一步不是写代码,是开权限
鸿蒙对"联网"管得很严。「不声明权限,请求会直接失败」,而且报错还不明显(常表现为网络异常)。所以在写任何请求代码之前,先去 entry/src/main/module.json5 里把 INTERNET 权限加上,并把 SDK 版本锁到 22:
{"module": {"name": "entry","compatibleSdkVersion": 22,"requestPermissions": [ {"name": "ohos.permission.INTERNET" } ] }}❝模拟器一般能直接联网;「真机」除了这行权限,还要应用已完成签名。没签名 / 没权限,请求必挂。
❞
三、http 模块最小实战:拉一个资讯列表
目标:启动页面时从网络拉一批文章,用 List + ForEach(第16篇)渲染出来,带"加载中"和"出错"两种状态,再给个刷新按钮。一个例子把 GET、状态、渲染、异常全串起来。
先定义数据模型(接口要和接口返回的字段对上):
import { http } from'@kit.NetworkKit'import { promptAction } from'@kit.ArkUI'// Data model: field names and types must match the JSON returned by the APIinterface Post { userId: number id: number title: string body: string}@Entry@Componentstruct NetDemo {@State posts: Post[] = []@State loading: boolean = false@State errorMsg: string = '' aboutToAppear(): void {this.fetchPosts() // fetch once when the page appears }// Fetch the post listasync fetchPosts() {this.loading = truethis.errorMsg = ''let req = http.createHttp() // ① create a request objecttry {const resp = await req.request('https://jsonplaceholder.typicode.com/posts', { method: http.RequestMethod.GET, connectTimeout: 10000, // connection timeout (ms) readTimeout: 10000// read timeout (ms) } )if (resp.responseCode === 200) {// ② by default, result is a string; parse it manuallyconst data = JSON.parse(resp.result asstring) as Post[]this.posts = data // ③ put it into @State, UI refreshes automatically } else {this.errorMsg = `Request failed, code=${resp.responseCode}` } } catch (err) {this.errorMsg = `Network error: ${(err asError).message}` } finally { req.destroy() // ④ release when done to avoid resource leaksthis.loading = false } } build() { Column({ space: 12 }) {// Top bar: title + refresh button Row() { Text('最新文章').fontSize(22).fontWeight(FontWeight.Bold) Blank() Button('刷新').onClick(() =>this.fetchPosts()) } .width('100%') .padding(16)// Three states: loading / error / normal listif (this.loading) { LoadingProgress().width(36).height(36) Text('加载中…').fontColor('#999') } elseif (this.errorMsg) { Text(this.errorMsg).fontColor(Color.Red) Button('重试').onClick(() =>this.fetchPosts()) } else { List({ space: 12 }) { ForEach(this.posts, (item: Post) => { ListItem() { Column({ space: 6 }) { Text(item.title) .fontSize(16) .fontWeight(FontWeight.Medium) Text(item.body) .fontSize(13) .fontColor('#666') .maxLines(2) .textOverflow({ overflow: TextOverflow.Ellipsis }) } .width('100%') .padding(12) .backgroundColor('#F5F5F5') .borderRadius(8) } }, (item: Post) => item.id.toString()) // use the unique id as the key } .width('100%') .layoutWeight(1) .padding({ left: 16, right: 16 }) } } .width('100%') .height('100%') }}四个关键点标在注释里了:建请求 → 拿结果 → 塞 @State → 销毁。跑起来你会看到列表是真的从网络来的,点"刷新"会重新拉。
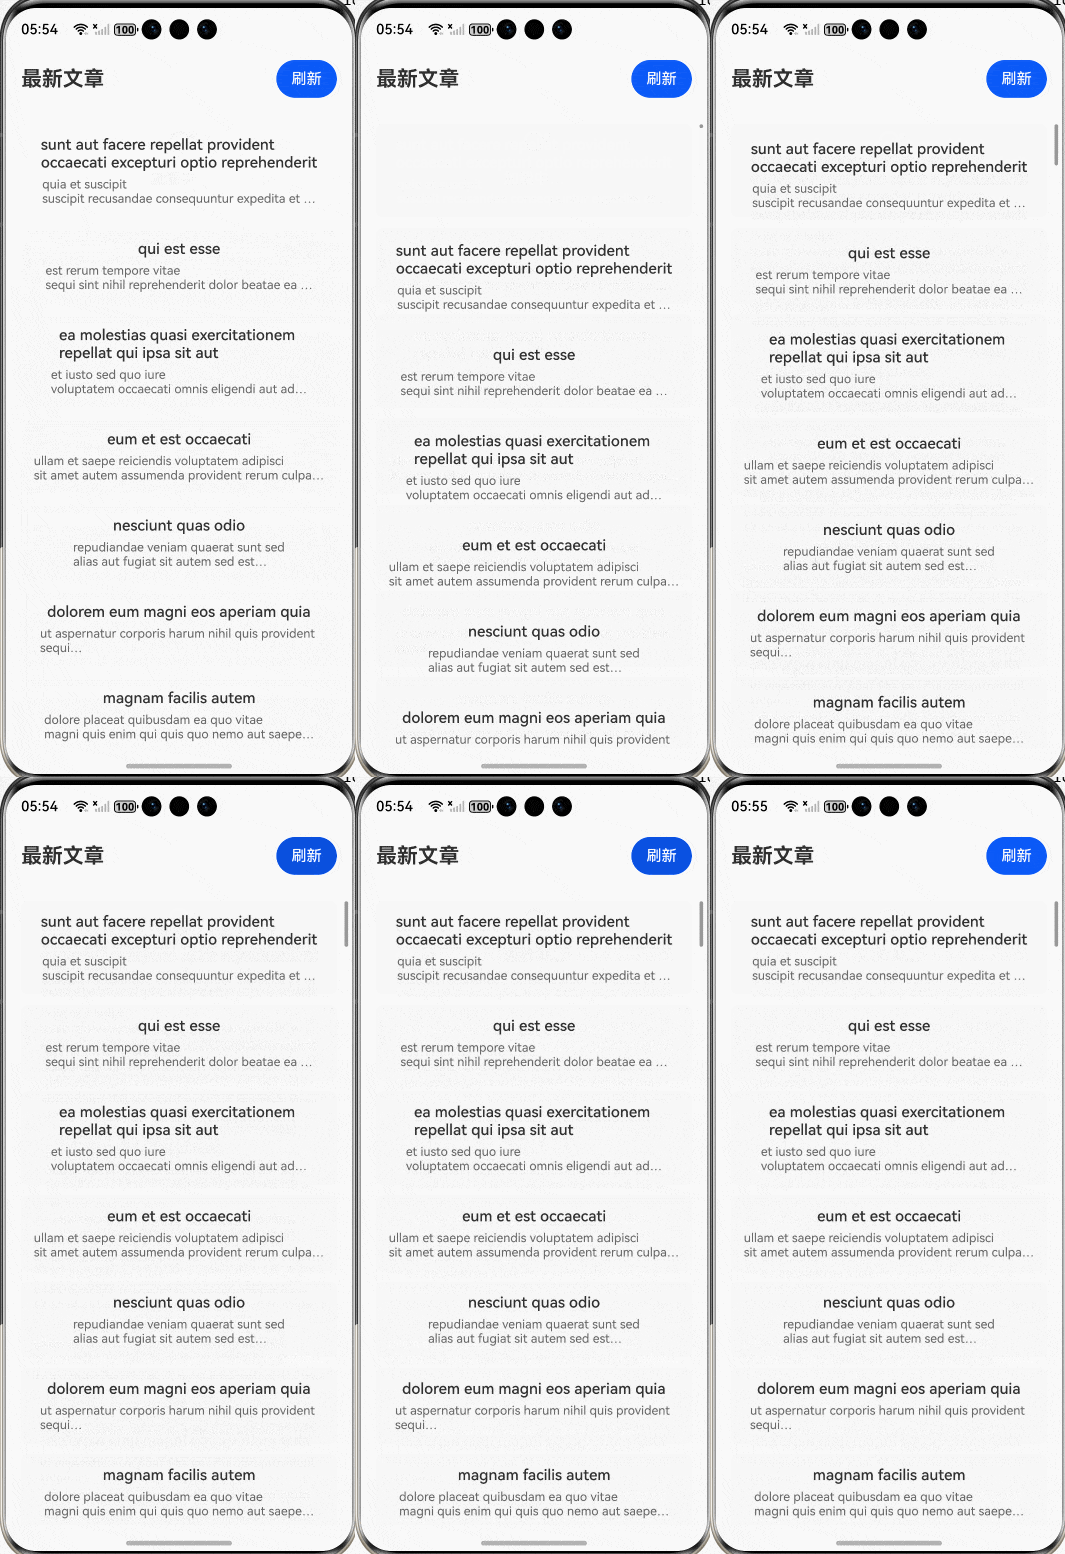
❝示例用的是公开的测试接口
❞jsonplaceholder.typicode.com,「换成你能访问的接口即可」。字段对不上就改Post接口。
四、POST:把数据交回服务器
GET 是"拿",POST 是"交"。比如发一条新文章,要把内容放进请求体(extraData),并告诉服务器这是 JSON:
async submitPost() {let req = http.createHttp()try {const resp = await req.request('https://jsonplaceholder.typicode.com/posts', { method: http.RequestMethod.POST,// Request body: serialize to a JSON string; pair it with Content-Type: application/json extraData: JSON.stringify({ title: '新标题', body: '正文内容', userId: 1 }), header: { 'Content-Type': 'application/json' }, connectTimeout: 10000, readTimeout: 10000 } )if (resp.responseCode === 201) { // 201 = Createdconst created = JSON.parse(resp.result asstring) promptAction.showToast({ message: `创建成功,id=${created.id}` }) } else { promptAction.showToast({ message: `提交失败,code=${resp.responseCode}` }) } } catch (err) { promptAction.showToast({ message: `网络错误:${(err asError).message}` }) } finally { req.destroy() }}要点:
extraData放请求体;发 JSON 就JSON.stringify(...)并带Content-Type: application/json。成功状态码通常是 200(OK)或201(Created);具体看后端约定。PUT/DELETE只是把method换成对应枚举,其余一致,不再赘述。
五、查询参数与鉴权 Header
上面的例子是"裸 URL、无登录"。但真实项目里,「拉列表几乎都要分页,调接口几乎都要登录态」。这两件事不引入任何新 API,只改 URL 和请求头。
1) GET 带查询参数(分页 / 筛选)
参数拼在 URL 后面,用 ? 开头、多个参数用 & 连接:
const page = 1const size = 10// Pagination: append ?page=1&size=10 to the URLconst url = `https://jsonplaceholder.typicode.com/posts?page=${page}&size=${size}`const resp = await req.request(url, { method: http.RequestMethod.GET })❝筛选、排序同理:
❞?category=tech&sort=hot。参数值含中文 / 特殊字符时记得用encodeURIComponent()处理。
2) 带鉴权 Header(Bearer Token)
绝大多数真实接口要求登录后带 token,放在 Authorization 请求头里:
// Token usually comes from a login response; store it safely (Preferences, covered later)const token = 'your_login_token_here'const resp = await req.request('https://api.example.com/posts', { method: http.RequestMethod.GET, header: {'Content-Type': 'application/json','Authorization': 'Bearer ' + token // attach the login token } })格式一般是 Bearer <token>(注意 Bearer 后有个空格)。「不要把 token 写死在源码里」;登录后从安全存储读取(数据持久化是后续篇章)。 POST / PUT / DELETE 完全一样,在各自的 header里加这一行即可。
3) RCP 怎么带?
RCP 在第七节用 SessionConfiguration.headers 一次配好(见第七节),或单次请求用 new rcp.Request(url, 'GET', { 'Authorization': 'Bearer ' + token })。
六、推荐:RCP(Remote Communication Kit)
「官方首推 RCP」 作为应用的远场通信框架。它比 http 模块更现代:会话复用、拦截器、缓存、连接池等能力开箱即用。下面是一段「可直接编译」的准确写法。
import { rcp } from'@kit.RemoteCommunicationKit'import { BusinessError } from'@kit.BasicServicesKit'// Create the session once and reuse it; cancel + close it when the page is gone.@Entry@Componentstruct RcpDemo {@State post: Post | null = null@State errorMsg: string = ''private session: rcp.Session = rcp.createSession() // at most 16 sessions per app aboutToAppear(): void {this.loadWithRcp() }// GET with RCP: session.get returns a Promise<Response>async loadWithRcp() {try {const response = awaitthis.session.get('https://jsonplaceholder.typicode.com/posts/1')if (response.statusCode === 200) {// response.toJSON() parses the JSON body into an objectthis.post = response.toJSON() as Post// response.headers holds the response headers if you need them } else {this.errorMsg = `Request failed, code=${response.statusCode}` } } catch (err) {const e = err as BusinessErrorthis.errorMsg = `RCP error: code=${e.code}, ${e.message}` } }// POST with RCP: pass the JSON string directly as the request bodyasync submitWithRcp() {try {const response = awaitthis.session.post('https://jsonplaceholder.typicode.com/posts',JSON.stringify({ title: 'New Title', body: 'Content', userId: 1 }) )if (response.statusCode === 201) {const created = response.toJSON() as Post promptAction.showToast({ message: `Created, id=${created.id}` }) } } catch (err) {const e = err as BusinessErrorthis.errorMsg = `RCP error: code=${e.code}, ${e.message}` } }// Cancel in-flight requests, then release the session when the page is destroyed aboutToDisappear(): void {this.session.cancel() // cancel all ongoing requests in this sessionthis.session.close() // free the session resources } build() {// Same UI pattern as the http example above Column({ space: 12 }) {if (this.errorMsg) { Text(this.errorMsg).fontColor(Color.Red) } elseif (this.post) { Column({ space: 6 }) { Text(this.post.title).fontSize(16).fontWeight(FontWeight.Medium) Text(this.post.body).fontSize(13).fontColor('#666') } .width('100%') .padding(12) .backgroundColor('#F5F5F5') .borderRadius(8) } } .width('100%') .height('100%') .padding(16) }}RCP 使用要点:
rcp.createSession()建会话,应用内最多 16 个;「可复用」,不用每次请求都新建,性能更好。session.get(url)/session.post(url, content)返回Promise<Response>;response.statusCode是状态码,response.toJSON()把响应体解析成对象,response.body是原始响应体。异常用 BusinessError(import { BusinessError } from '@kit.BasicServicesKit')拿code+message。页面销毁( aboutToDisappear)时先session.cancel()取消在途请求,再session.close()释放资源。需要更细的控制(自定义 header、超时、拦截器、上传/下载),用 session.fetch(new rcp.Request(...))+SessionConfiguration。
❝路线建议:先把第3、4节的
❞http模块跑通理解"请求→塞@State"的主线,再用本节的 RCP 升级。新项目直接上 RCP 也完全可以。
七、请求取消 与 RCP SessionConfiguration
1) 离开页面,取消在途请求
网络请求是异步的。「如果用户在你等到响应之前就跳走了」,回调可能去改一个已经销毁的页面 → 崩溃或告警。所以页面销毁时要主动取消:
「 http」:把req存成字段,在aboutToDisappear里req.destroy()(destroy()会取消在途请求并释放)。「RCP」: session.cancel()取消本会话所有在途请求,再session.close()释放资源。
// http: keep the request reference as a fieldprivate req: http.HttpRequest | null = nullasync fetchPosts() {this.req = http.createHttp()try {const resp = awaitthis.req.request(/* ... */)// ... handle response ... } catch (err) {// ... handle error ... } finally {this.req.destroy()this.req = null }}aboutToDisappear(): void {this.req?.destroy() // cancel if the request is still in flight}❝第三节的
❞NetDemo用try/finally保证"请求完成后"释放;这一节补的是"页面提前跳走、请求还没回"的情况。两者互补,真实项目都要有。
2) RCP SessionConfiguration:基地址 + 默认超时 + 默认 Header
每次请求都重复写 base URL、token、超时很啰嗦。把这些配在会话上,一次搞定:
import { rcp } from'@kit.RemoteCommunicationKit'const token = 'your_login_token_here'// Configure once: base address, default auth header, default timeoutconst sessionConfig: rcp.SessionConfiguration = { baseAddress: 'https://api.example.com', // shared base URL headers: { 'Authorization': 'Bearer ' + token } as rcp.RequestHeaders, // default header for every request requestConfiguration: { transfer: { timeout: { connectMs: 10000, transferMs: 10000 } // default connect/read timeout (ms) } }}const session = rcp.createSession(sessionConfig)// Relative URLs now resolve against baseAddress, and every request carries the token + timeout automaticallyconst resp = await session.get('/posts/1') // => https://api.example.com/posts/1好处:
「一处配置,处处生效」:切环境(开发 / 生产)只改 baseAddress;token 只写一次。「单个请求仍可覆盖」:需要特殊 header / 超时,用 new rcp.Request(url, method, headers, content)传参即可。配合第七节的 cancel()+close(),就是一套完整的"现代、稳、好维护"的网络层雏形。
八、和前面篇的关系(网络不创造新范式)
把今天的内容和前面串一下,你会发现它依旧是"状态驱动":
「数据是 @State的燃料」(接第13~15篇):请求回来this.posts = data,UI 刷新的机制和第12~15篇一模一样;网络只是"数据从哪来"变了。「列表渲染照旧」(接第16篇):拉回来的数组直接喂给 ForEach/List,没有任何新语法。「转场也能接上」(接第20篇):数据加载完想"淡入"列表,把赋值包进 animateTo即可——但网络请求本身别塞进animateTo闭包(第20篇坑8)。
记一句总纲:
❝「网络请求不新创造 UI 机制,它只是把"数据来源"从本地写死,换成了远端服务器。拿到数据后,一切照旧交给
❞@State和组件树。」
九、踩坑提醒
「忘加
INTERNET权限 → 请求必挂」:真机 / 模拟器都先确认module.json5的requestPermissions里有ohos.permission.INTERNET,否则报错不明显(常是网络异常)。「
result默认是 string,要自己JSON.parse」:http接口返回 JSON 时,resp.result默认是字符串。要么JSON.parse(resp.result as string),要么在 options 里设responseType: http.ResponseType.JSON让框架直接解析成对象——「但设了 JSON,就不要再当 string 用」,类型要对上。RCP 用response.toJSON()即可。「请求完要
req.destroy()(http)/session.close()(RCP)」:http.createHttp()创建的实例不会自动回收(复用场景除外),不destroy会资源泄漏;RCP 会话用close()释放。都写进try/finally或aboutToDisappear最稳。「网络是异步的,别假设"马上拿到"」:
await是协程挂起、不阻塞 UI 线程(OK),但aboutToAppear里发请求后,数据还没回来,UI 要靠@State+ loading 态兜底,别直接读"还没赋值的数组"。「别在
animateTo闭包里写网络请求」(接第20篇坑8):闭包只描述"要一起做动画的状态变化",塞副作用会出怪问题。「真机要签名 + 权限,模拟器要能联网」:权限声明了但没签名,或模拟器宿主机断网,请求都会失败。
「默认要求 HTTPS」:鸿蒙对明文 HTTP 有安全限制,直接用 HTTPS 最省事。非要走 HTTP,需要额外配置网络安全策略(不同 API 版本配置不同,容易踩坑)。
「超时别乱设」:
connectTimeout/readTimeout单位是 ms;弱网场景适当放大以免频繁超时,但也不要设得过大或设0,否则可能长时间无响应却无报错,不利于排查。「大文件用专门 API」:
http拿 JSON / 小文本用request;下载大文件用requestInStream/downloadFile(RCP 用session.download),上传用uploadFile(RCP 用session.upload),别拿request硬扛。「先判
responseCode/statusCode,再 catch 异常」:200/201是业务成功,4xx是客户端问题(参数/权限),5xx是服务端问题;网络彻底连不上才进catch。两层都要处理,体验才完整。「页面跳走要取消在途请求」:用户提前离开时,没取消的请求回调可能打到已销毁页面。记住
http用req.destroy()、RCP用session.cancel()+session.close()(接第七节)。
十、一张图总结
┌────────────────────────────────────────────────────────────────┐│ 网络请求 决策树 (API 22) ││ ││ 我要? ││ ├─ 新项目 / 现代框架 → RCP session.get / post ││ ├─ 拿 / 提交 JSON 小数据 → http.request(GET / POST) ││ ├─ 下载大文件 → http.downloadFile / RCP download││ ├─ 上传文件 → http.uploadFile / RCP upload ││ ││ 高级套路(真实项目必用): ││ · 分页/筛选 → URL 拼 ?page=1&size=10 ││ · 登录态 → header 带 Authorization: Bearer <token> ││ · 跳走不崩 → http: req.destroy() / RCP: cancel()+close() ││ · 少写重复 → RCP SessionConfiguration(baseAddress+header) ││ ││ 四步固定动作: ││ ① 权限(INTERNET) + SDK 22 → ② create → ③ request + 塞 @State ││ → ④ destroy / close(放 finally 或 aboutToDisappear) ││ ││ 真相:网络只是"数据来源",拿到后一切交给 @State(接13~15篇) │└────────────────────────────────────────────────────────────────┘session.get/post | |
http.request(GET/POST) | |
http.downloadFilerequestInStream / RCP session.download | |
http.uploadFilesession.upload | |
?key=value&key2=value2 | |
Authorization: Bearer <token> | |
httpreq.destroy();RCP:session.cancel() + session.close() | |
@State → 自动刷新(第13~15篇) |
留言区见~
随机文章
-
 10个月宝宝每天需要喝多少奶粉?
- iOS 27 Beta 5更新内容
- iOS 27 Beta 4推送了,3.3GB更新没等来国行AI,修Bug这一波更像正式版前夜
- iOS 26.6.1 RC 来了,正式版预计下周推送
- 苹果又推 iOS 27 公测版,新包其实还是 Beta 4 那套,别白激动了
- iOS 27 Beta5来了:图标大换血,国行AI还是没来!
- iOS 26丨优质壁纸
- iOS 27 Beta 5为Siri、Safari、设置等带来了新的图标
- iOS 26.6.1 RC 新系统更新来了!
- iOS 26.4.2要来了,先别急着兴奋,这次大概率还是修Bug和安全补丁真香
- iOS 27 Beta 5 更新内容预览,有不少新变化!