黄sir说在前面
分布式开发是鸿蒙最核心的能力之一,也是面试必问的内容。很多同学跟我说,看官方文档看得云里雾里的,今天我们就来把这个概念彻底讲清楚。
学完这篇,你不仅能理解原理,还能真正写出来能用的代码。
一、分布式到底是个什么东西?
先别急着看代码,我们先把概念搞懂。
传统的App是怎么工作的?你的手机App就只跑在你的手机上,跟其他设备没什么关系。
但鸿蒙不一样。它想做的是——让设备们像一个整体一样工作。
举个例子:
你在手机上编辑文档,突然想用平板继续编辑。传统做法是什么?文件发过来,对吧?但鸿蒙的做法是——你直接打开平板,文档就在那儿等你,连复制粘贴都省了。
这就是设备互助、能力共享。
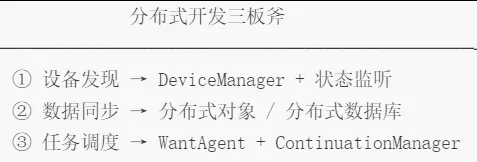
鸿蒙靠什么实现这个?三个核心:
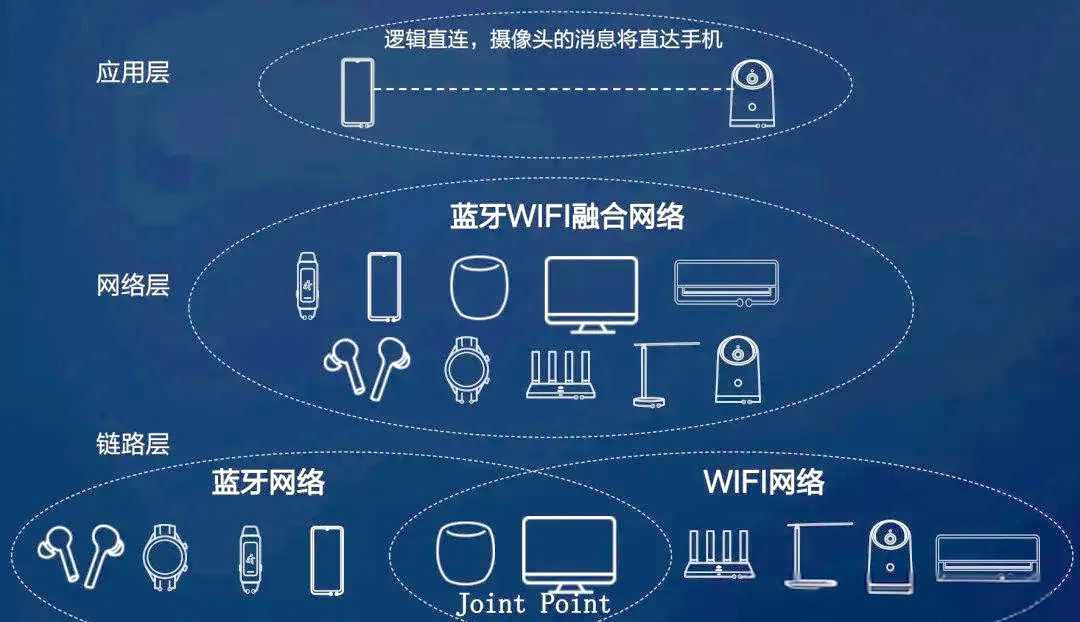
二、设备发现:你的App怎么找到其他设备?
这一步是基础。你得先发现设备,才能跟它通信对吧?
2.1 先拿到设备管理器
import deviceManager from '@ohos.distributedDeviceManager';let dmInstance: deviceManager.DeviceManager | null = null;deviceManager.createDeviceManager('com.example.app', (err, dm) => { if (err) { console.error('创建设备管理实例失败: ' + JSON.stringify(err)); return; } dmInstance = dm; console.info('好,设备管理器拿到手了');});
这一步就像,你去超市之前先得有个购物袋。
2.2 获取周围的设备
functiongetTrustedDevices() { if (!dmInstance) { console.info('等等,设备管理器还没初始化'); return []; } const deviceInfoList = dmInstance.getTrustedDeviceListSync(); return deviceInfoList.map(device => ({ deviceId: device.deviceId, deviceName: device.deviceName, deviceType: device.deviceType, networkId: device.networkId }));}
划重点:这里获取的是「已配对」的设备,不是周围所有的设备。新设备第一次用,需要先配对认证。
2.3 监听设备状态变化
const deviceStateCallback = (result) => { switch (result.action) { case deviceManager.DeviceStateChangeAction.ONLINE: console.info(`有设备上线了: ${result.device.deviceName}`); break; case deviceManager.DeviceStateChangeAction.OFFLINE: console.info(`有设备跑了: ${result.device.deviceName}`); break; case deviceManager.DeviceStateChangeAction.INFO_CHANGE: console.info(`设备信息变了: ${result.device.deviceId}`); break; }};dmInstance.on('deviceStateChange', deviceStateCallback);dmInstance.off('deviceStateChange', deviceStateCallback);
老毛病了:很多人写完忘记取消监听,然后页面销毁了还在不断回调,内存泄漏就这么来的。三、设备选择器实战
光说不练假把式,我们来写一个设备选择器。
@Entry@Componentstruct DeviceSelector { @State devices: DeviceInfo[] = [] @State selectedDevice: DeviceInfo | null = null @State isDiscovering: boolean = false aboutToAppear() { this.startDeviceDiscovery() } aboutToDisappear() { this.stopDeviceDiscovery() } startDeviceDiscovery() { this.isDiscovering = true setTimeout(() => { this.devices = [ { deviceId: '001', deviceName: '华为平板-MatePad', deviceType: 0x0D }, { deviceId: '002', deviceName: '华为手表-Watch 4', deviceType: 0x1F }, { deviceId: '003', deviceName: '智慧屏-TV', deviceType: 0x0A } ] this.isDiscovering = false }, 1000) } selectDevice(device: DeviceInfo) { this.selectedDevice = device console.info(`你选择了: ${device.deviceName}`) } build() { Column() { Text('🎯 选择目标设备') .fontSize(24).fontWeight(FontWeight.Bold).padding(16) if (this.isDiscovering) { LoadingProgress().height(60) Text('正在搜索附近设备...').fontColor('#666').margin({ top: 10 }) } else { List() { ForEach(this.devices, (device: DeviceInfo) => { ListItem() { DeviceItem({ device: device, isSelected: this.selectedDevice?.deviceId === device.deviceId, onSelect: () => this.selectDevice(device) }) } }) } .divider({ strokeWidth: 1, color: '#eee' }) } } .width('100%').height('100%') }}@Componentstruct DeviceItem { @Prop device: DeviceInfo @Prop isSelected: boolean onSelect: () => void build() { Row() { Column() { Text(this.device.deviceName).fontSize(16) Text(`ID: ${this.device.deviceId.substring(0, 8)}...`) .fontSize(12).fontColor('#999') } .alignItems(HorizontalAlign.Start) Blank() if (this.isSelected) { Text('✓ 已选择').fontColor('#00A870') } else { Button('连接').onClick(this.onSelect) } } .width('100%').padding(16) .backgroundColor(this.isSelected ? '#E8F8F0' : '#FFFFFF') }}class DeviceInfo { deviceId: string = '' deviceName: string = '' deviceType: number = 0}
这个组件可以直接用到你的项目里。
四、分布式数据:数据是怎么"飞"起来的?
这是重点中的重点。
4.1 分布式数据对象
import distributedDataObject from '@ohos.data.distributedDataObject';let userProfile: distributedDataObject.DataObject | null = null;function initDistributedObject(deviceId: string) { userProfile = distributedDataObject.createNativeDistributedObject({ name: '张三', age: 25, avatar: 'default.png' }); userProfile.on('change', (changedData) => { console.info('数据变了!变更内容: ' + JSON.stringify(changedData)); }); // 关键步骤:加入设备组 userProfile.setSessionId(deviceId);}function updateUserName(newName: string) { if (userProfile) { userProfile.write('name', newName); }}
写起来跟你平时用变量没什么区别,但底层已经帮你做好同步了。
4.2 分布式数据库
如果数据结构复杂,用分布式数据库:
import relationalStore from '@ohos.data.relationalStore';const STORE_CONFIG = { name: 'my_database.db', securityLevel: relationalStore.SecurityLevel.S1};let rdbStore: relationalStore.RdbStore | null = null;async function initDatabase() { const context = getContext(this); rdbStore = await relationalStore.getRdbStore(context, STORE_CONFIG); const CREATE_TABLE_SQL = ` CREATE TABLE IF NOT EXISTS users ( id INTEGER PRIMARY KEY AUTOINCREMENT, name TEXT NOT NULL, email TEXT, create_time INTEGER ) `; await rdbStore.executeSql(CREATE_TABLE_SQL); console.info('数据库建好了');}async function insertUser(user: User) { const valueBucket = { name: user.name, email: user.email, create_time: Date.now() }; const rowId = await rdbStore.insert('users', valueBucket); return rowId;}interface User { id?: number name: string email: string}
数据库这部分的API跟Android的SQLite很像,有基础的同学应该很好上手。
五、任务调度:让任务在不同设备之间"跑"
想象这个场景:你在手机上编辑文档,编到一半想用平板的大屏幕继续。不用复制粘贴,文档直接"漂"到平板上,从哪儿停的就在哪儿继续。
这就是分布式迁移。
5.1 启动远程Ability
import wantAgent from '@ohos.wantAgent';async function startRemoteAbility(targetDeviceId: string) { const wantAgentInfo = { wants: [{ bundleName: 'com.example.remoteapp', abilityName: 'RemoteAbility', deviceId: targetDeviceId }], operationType: wantAgent.OperationType.START_ABILITY, requestCode: 100, wantAgentFlags: [wantAgent.WantAgentFlags.UPDATE_PRESENT_FLAG] }; const agent = await wantAgent.getWantAgent(wantAgentInfo); await wantAgent.triggerWantAgent(agent, (err) => { if (err) { console.error('跳转失败'); } else { console.info('成功跳转到远程设备'); } });}
5.2 迁移你的页面状态
import continuationManager from '@ohos.app.ability.continuationManager';function registerContinuation() { continuationManager.registerContinuationCallback({ onContinue(abilityName, wantParams) { console.info(`收到迁移请求,准备把${abilityName}迁移走`); const pageState = { data: getCurrentPageData(), scrollPosition: getScrollPosition(), timestamp: Date.now() }; wantParams['pageState'] = JSON.stringify(pageState); return continuationManager.ContinuationResult.CONTINUATION; }, onRemoteTerminated() { console.info('远程设备已经关掉了,我可以休息了'); } });}
六、综合实战:写个跨设备音乐播放器
@Entry@Componentstruct DistributedMusicPlayer { @State isPlaying: boolean = false @State currentDevice: string = '' @State currentSong: string = '选择设备开始播放' @State currentTime: string = '00:00 / 00:00' onDeviceSelected(deviceName: string) { this.currentDevice = deviceName promptAction.showToast({ message: `已切换到 ${deviceName} 播放`, duration: 1500 }) } togglePlay() { if (!this.currentDevice) { promptAction.showToast({ message: '先选个设备啊!', duration: 2000 }) return } this.isPlaying = !this.isPlaying if (this.isPlaying) { this.currentSong = '周杰伦 - 晴天' this.currentTime = '00:00 / 04:29' } } build() { Column() { Text('🎵 分布式音乐') .fontSize(28).fontWeight(FontWeight.Bold).padding(20) Column() { Column() { Text('🎶').fontSize(80) } .width(200).height(200) .backgroundColor('#F5F5F5') .borderRadius(16) .justifyContent(FlexAlign.Center) Text(this.currentSong).fontSize(20).fontWeight(FontWeight.Medium).margin({ top: 20 }) Text(this.currentTime).fontSize(14).fontColor('#999').margin({ top: 8 }) Text(`播放设备: ${this.currentDevice || '未选择'}`).fontSize(14).fontColor('#666').margin({ top: 12 }) } .height(350).justifyContent(FlexAlign.Center) Row() { Button('⏮').fontSize(24).width(50).height(50).borderRadius(25).onClick(() => {}) Button(this.isPlaying ? '⏸' : '▶') .fontSize(32).width(64).height(64).borderRadius(32).backgroundColor('#00A870') .onClick(() => this.togglePlay()) Button('⏭').fontSize(24).width(50).height(50).borderRadius(25).onClick(() => {}) } .width('100%').justifyContent(FlexAlign.SpaceEvenly).padding({ top: 30, bottom: 30 }) Column() { Text('📱 选择播放设备').fontSize(16).fontColor('#666') .alignSelf(HorizontalAlign.Start).padding({ left: 20, bottom: 12 }) List() { ForEach(['手机', '平板', '智慧屏', '音箱'], (device: string) => { ListItem() { Row() { Text(device).fontSize(16) Blank() if (this.currentDevice === device) { Text('✓ 当前').fontColor('#00A870').fontSize(14) } } .width('100%').padding(16) .onClick(() => this.onDeviceSelected(device)) } }) } .divider({ strokeWidth: 1, color: '#f0f0f0' }) .backgroundColor('#FFFFFF').borderRadius(12) } .padding({ left: 16, right: 16 }) } .width('100%').height('100%').backgroundColor('#FAFAFA') }}
七、避坑指南
总结
搞懂这三个,你的鸿蒙分布式开发就算入门了。
有问题欢迎留言,下期想看什么,告诉我。